实验笔记
mininet
- 显示帮助
$ sudo mn -h - 发出mininet cli命令时用
mininet>作为前缀 sudo mn进入$ sudo mn -x开启同时给每个节点都打开一个exterm窗口
基础命令
- 在进入
mininet>模式后使用
信息显示
helpnodes显示节点net显示linksdump显示所有节点的信息- 创建时默认为
h1 --- s1 --- h2 exit退出sudo mn -c清理
节点操控
- 要对节点命令则要在命令前面加上节点的名字
h1 ifconfig -a-
或者
h1 xterm可以单独打开一个新窗口用于对节点进行操作(在这个页面的操作默认都是针对h1) -
检查节点连通性
h1 ping -c 1 h2 - 1表示ping的次数
pingall全部检查
wireshark
- 打开wireshark检测节点
mininet> h1 wireshark & - 选择接口进行监听
数据包解释
switchyard
-
创建虚拟环境
$ python3 -m venv syenv -
推荐格式 ├── workspace │ ├── Lab-1-YourName │ │ └── ... │ ├── Lab-2-YourName │ │ └── ... │ └── syenv └── switchyard -
激活(启动)虚拟环境
source ./syenv/bin/activate(在study文件夹中) -
deactivate退出环境 -
运行
$ swyard -t examples/myhub_testscenario.py examples/myhub.py -
-t表示测试模式
- 第一个文件表示测试场景文件
- 后一个文件表示被测试的文件
测试案例
from switchyard.lib.userlib import *
import time

def new_packet(hwsrc, hwdst, ipsrc, ipdst, reply=False):
    ether = Ethernet(src=hwsrc, dst=hwdst, ethertype=EtherType.IP)
    ippkt = IPv4(src=ipsrc, dst=ipdst, protocol=IPProtocol.ICMP, ttl=32)
    icmppkt = ICMP()
    if reply:
        icmppkt.icmptype = ICMPType.EchoReply
    else:
        icmppkt.icmptype = ICMPType.EchoRequest
    return ether + ippkt + icmppkt

# 以上为框架
def test_hub():
    # 端口初始化
    s = TestScenario("hub tests")
    s.add_interface('eth0', '10:00:00:00:00:01')
    s.add_interface('eth1', '10:00:00:00:00:02')
    s.add_interface('eth2', '10:00:00:00:00:03')

    # 从20:00:00:00:00:02发送到20:00:00:00:00:01的包
    testpkt = new_packet("20:00:00:00:00:02", "20:00:00:00:00:01", "2.2.2.2", "1.1.1.1")# 包的信息
    # 对进入端口的期望
    s.expect(PacketInputEvent("eth1", testpkt, display=Ethernet), "An Ethernet frame from 20:00:00:00:00:02 to 20:00:00:00:00:01 should arrive on eth1")
    # 对发出的期望
    s.expect(PacketOutputEvent("eth0", testpkt,["eth0", testpkt(可以指定多个发出地点)], display=Ethernet), "Ethernet frame destined to 20:00:00:00:00:01 should be sended to eth0")
    #等待5s
    s.expect(PacketInputTimeoutEvent(5),"wait 5s")
    # 从20:00:00:00:00:03的广播包
    testpkt = new_packet("20:00:00:00:00:03", "ff:ff:ff:ff:ff:ff", "3.3.3.3", "255.255.255.255")
    s.expect(PacketInputEvent("eth2", testpkt, display=Ethernet), "An Ethernet frame from 20:00:00:00:00:02 to ff:ff:ff:ff:ff:ff should arrive on eth2")
    s.expect(PacketOutputEvent("eth0", testpkt, "eth1", testpkt, display=Ethernet), "Ethernet frame with a broadcast destination address should be  flooded out eth0 and eth1")

    #以下为框架
    return s
scenario = test_hub()
python API
(以太网)数据包解析(lab2)
-
数据包接收
timestamp,input_port,packet = net.recv_packet() -
数据包发送
send_packet(output_port, packet) -
前面都需要带上
self.net. -
switch的接口信息:
net.interfaces() -
返回列表、列表中每个元素具有属性
name:以字符串形式返回接口的名称ethaddr:返回与接口关联的以太网地址(mac)ipaddr:返回与接口关联的 IPv4 地址(如果有),没有则发挥0.0.0.0netmask:返回与分配给接口的 IPv4 地址关联的网络掩码。ifnum:返回与接口关联的整数索引。iftype:返回接口的类型(如果可以通过开关站推断)。
-
查找接口
- interface_by_name(name)等,根据不同属性查找
-
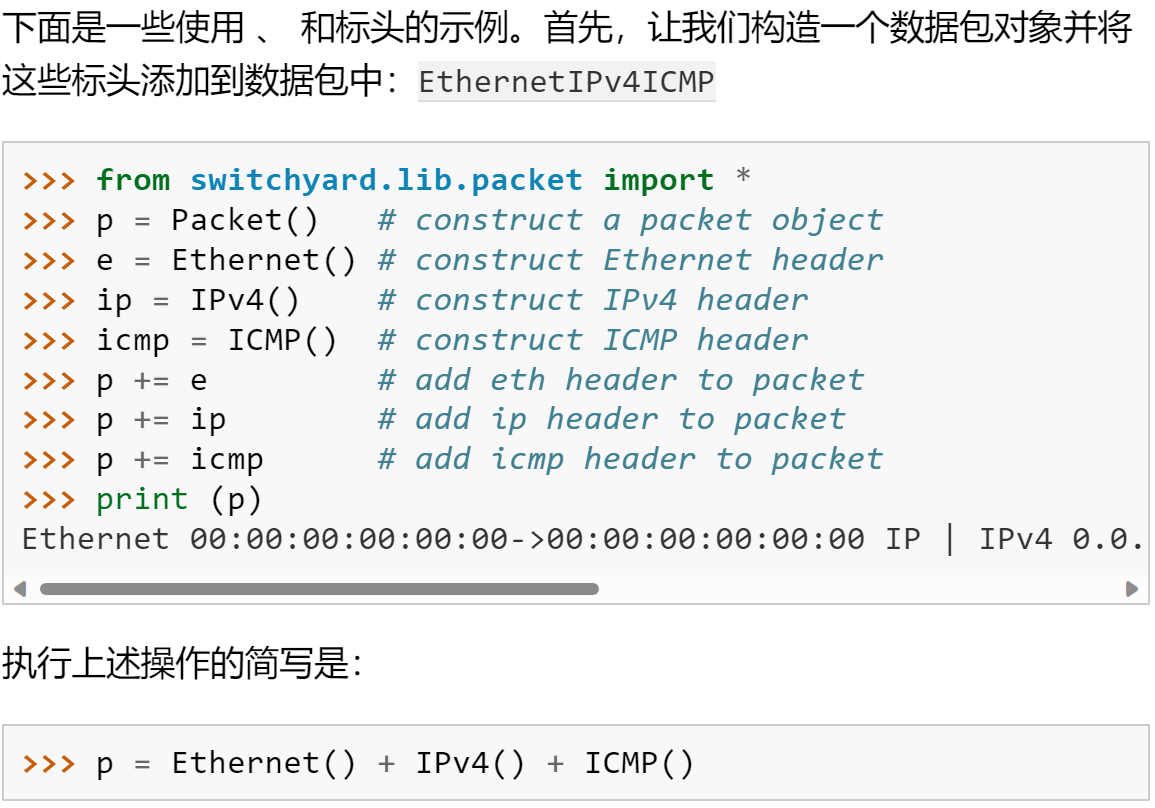
数据包构造:
-
-
p.num_headers()返回数据包中的包头数目 -
size()返回大小 -
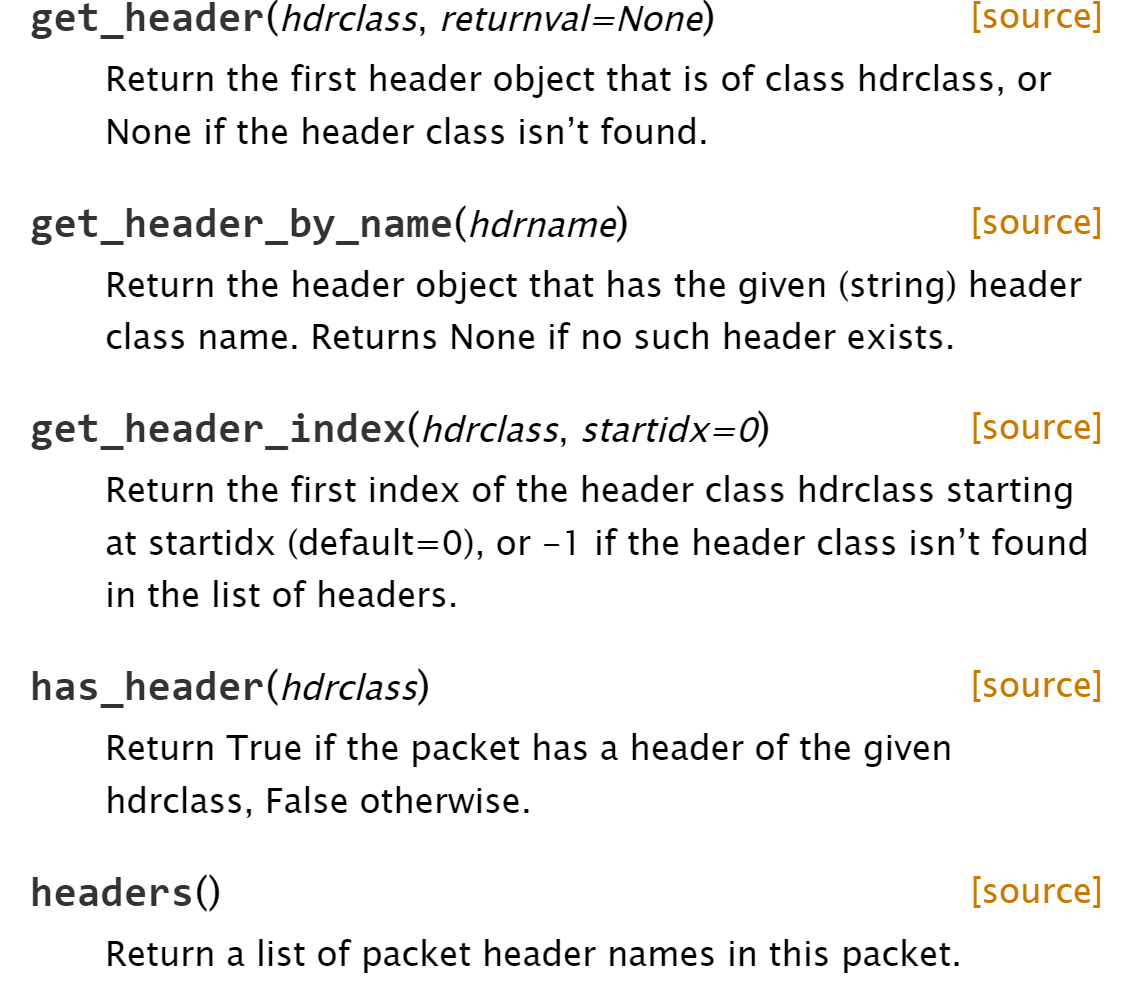
访问标头对象
-
全部输出
print(p) -
赋值
-
python >>> e = Ethernet(src="11:22:33:44:55:66", dst="66:55:44:33:22:11", ethertype=EtherType.IP) >>> ip = IPv4(src="1.2.3.4", dst="4.3.2.1", protocol=IPProtocol.UDP, ttl=32) >>> udp = UDP(src=1234, dst=4321) >>> p = e + ip + udp + b"this is some application payload!" >>> print(p) Ethernet 11:22:33:44:55:66->66:55:44:33:22:11 IP | IPv4 1.2.3.4->4.3.2.1 UDP | UDP 1234->4321 | RawPacketContents (33 bytes) b'this is so'... >>> -
```python
p.has_header(ICMP) True p.get_header_index(ICMP) 2 p[2] # access by index; notice no conversion to string
p[ICMP] # access by header type p[ICMP].icmptype icmp.icmpdata.sequence 0 icmp.icmpdata.identifier 0 icmp.icmpdata.identifier = 42 icmp.icmpdata.sequence = 13 print (p) Ethernet 00:00:00:00:00:00->00:11:22:33:44:55 IP | IPv4 0.0.0.0->149.43.80.13 ICMP | ICMP EchoRequest 42 13 (0 data bytes) ``` -
```python
p.has_header(IPv4) True p.get_header_index(IPv4) 1 str(p[1]) # access by index 'IPv4 0.0.0.0->0.0.0.0 ICMP' str(p[IPv4]) # access by header type 'IPv4 0.0.0.0->0.0.0.0 ICMP' p[IPv4].protocol
-
```python
p[0] # access by index
p[0].src EthAddr('00:00:00:00:00:00') p[0].dst EthAddr('00:00:00:00:00:00') p[0].dst = "ab:cd:ef:00:11:22" str(p[0]) 'Ethernet 00:00:00:00:00:00->ab:cd:ef:00:11:22 IP' p[0].dst = EthAddr("00:11:22:33:44:55") str(p[0]) 'Ethernet 00:00:00:00:00:00->00:11:22:33:44:55 IP' p[0].ethertype
-
路由器
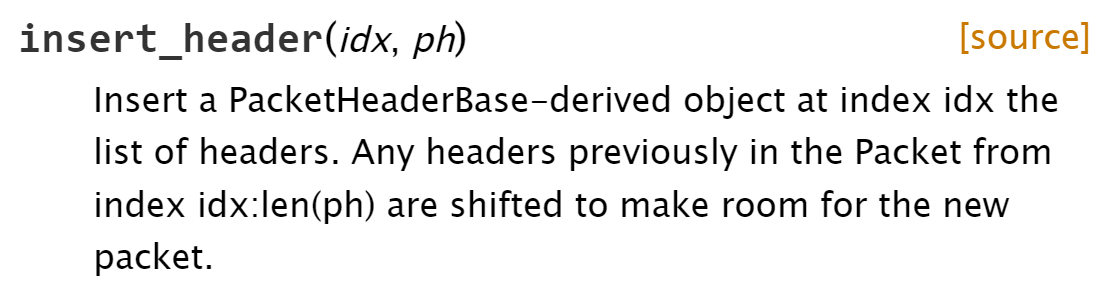
包头
- 获取

- 插入
分类
-
以太网
-
dst+type+src
- type
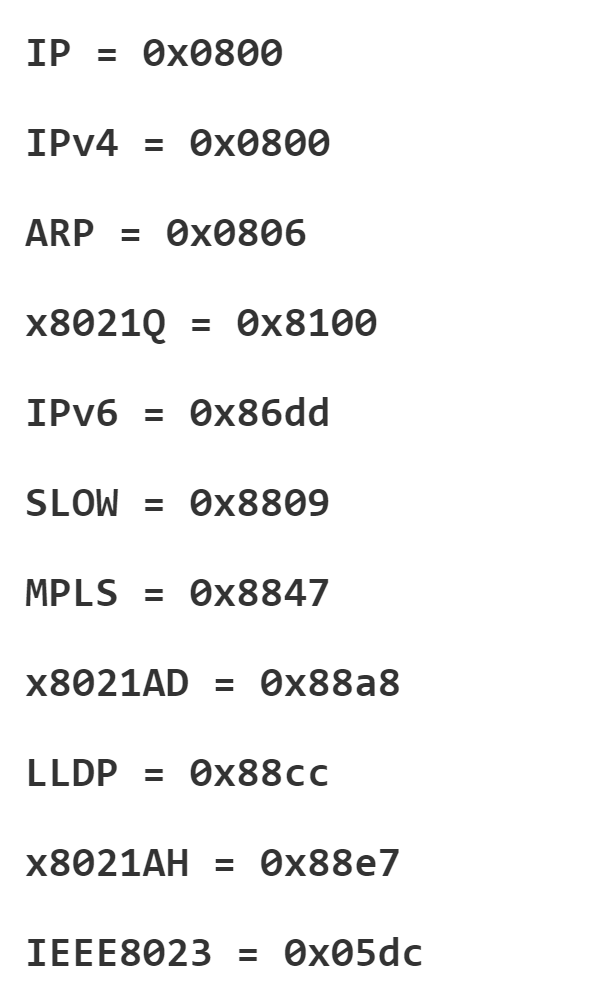
- type
-
python e = Ethernet(src="de:ad:00:00:be:ef", dst="ff:ff:ff:ff:ff:ff", ethertype=EtherType.ARP) -
py >>> e = Ethernet() >>> e.src = "de:ad:00:00:be:ef" >>> e.dst = "ff:ff:ff:ff:ff:ff" >>> e.ethertype = EtherType.ARP -
arp包头
-
获取
arp = packet.get_header(Arp) -
包含四个地址(源地址、目的地址mac+ip)
python
  ether = Ethernet()
  ether.src = srchw
  ether.dst = 'ff:ff:ff:ff:ff:ff'
  ether.ethertype = EtherType.ARP
  arp = Arp(operation=ArpOperation.Request,
            senderhwaddr=srchw,
            senderprotoaddr=srcip,
            targethwaddr='ff:ff:ff:ff:ff:ff',
            targetprotoaddr=targetip)
  arppacket = ether + arp
-
IP:
senderprotoaddrandtargetprotoaddr -
Mac:
senderhwaddrandtargethwaddr -
arp生成
-
```python create_ip_arp_reply(senderhwaddr, targethwaddr, senderprotoaddr, targetprotoaddr)
```python create_ip_arp_request(senderhwaddr, senderprotoaddr, targetprotoaddr) -
ipv4包头
-
>>> ip = IPv4()
    >>> ip.srcip = '10.0.1.1'
    >>> ip.dstip = '10.0.2.42'
    >>> ip.protocol = IPProtocol.UDP
    >>> ip.ttl = 64
其他
-
路由器信息获取
-
self.net.interfaces()- Return a list of interfaces incident on this node/router. Each item in the list is an Interface object, each of which includes name, ethaddr, ipaddr, and netmask attributes.
-
前缀匹配&ipv4地址
-
方法一:
python
  prefix = IPv4Address('172.16.0.0')
  mask = IPv4Address('255.255.0.0')
  destaddr = IPv4Address('172.16.23.55')
  matches = (int(mask) & int(destaddr)) == int(prefix)
  # matches -> True
-
方法二
prefixnet = IPv4Network('172.16.0.0/16')
  # same as IPv4Network('172.16.0.0/255.255.0.0')
  matches = destaddr in prefixnet
  # matches -> True
命令表
lab2
//提供案例
swyard -t testcases/myswitch_to_testscenario.srpy myswitch_to.py
//自定义案例
swyard -t testcases/mytestscenario_to.py myswitch_to.py
//运行交换机
swyard myswitch_to.py
lab3
sudo python start_mininet.py
swyard -t testcases/ myrouter.py
swyard myrouter.py
补充
关系
- Mininet是一个模拟软件定义网络(SDN)的工具,它可以在一台计算机上创建一个虚拟的网络拓扑,包括主机、交换机、控制器等组件。(类似于自定义创建一个物理网络结构)
- Wireshark是一个网络协议分析器,它可以捕获和显示网络上的数据包,以及分析各种协议的细节。
- Switchyard是一个教学用的框架,它可以让学生实现自己的网络设备和协议,并在Mininet中测试它们。(编写网络系统的软件以及进行测试,相当于给网络设备写固件)
这些工具之间的关系是:您可以使用Switchyard来编写自己的交换机或路由器程序,并在Mininet中运行它们;然后您可以使用Wireshark来观察和分析Mininet中的网络流量,以及您实现的协议是否正确。
流程
- 生成mininet网络(使用指定策略)
$ sudo python examples/start_mininet.py - 对交换机单独打开一个界面,方便进行设置
mininet> xterm hub - wireshark监控
mininet> h1 wireshark & - 在xterm中激活虚拟环境
source ./syenv/bin/activate后给hub写入switchyard固件swyard examples/myhub.py pingall测试- 或使用py文件设计测试案例进行测试
swyard -t examples/myhub_testscenario.py examples/myhub.py