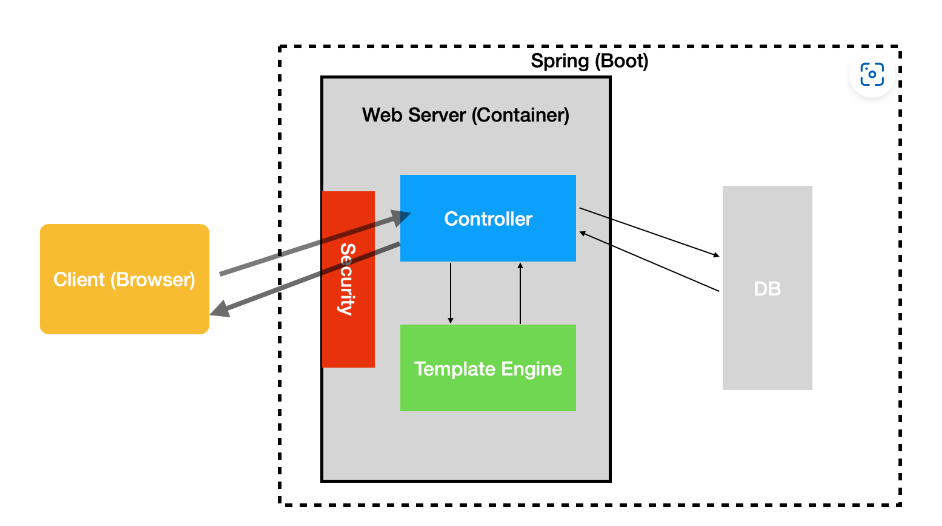
Spring
基本概念
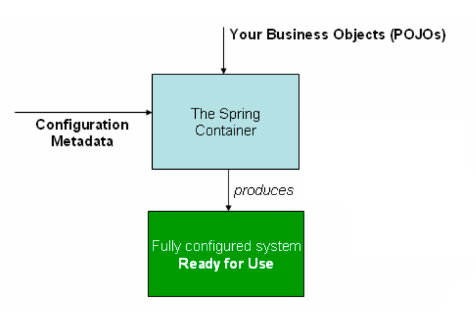
- Spring 是一个容器,通过反转控制(IoC)和依赖注入(DI)来实现高内聚、低耦合的应用。除此之外它可以整合很多第三方框架,它还提供面向切面编程(AOP)的能力,对数据库事务的管理尤其方便。
-
功能
- 帮助通过配置方式来创建对象,管理对象之间依赖关系
- Spring 面向切面编程能帮助我们无耦合的实现日志记录、性能统计、安全控制。这些日志记录、权限控制、性能统计从业务逻辑中分离出来,通过 Spring 支持的面向切面编程,动态添加这些功能,无需渗透到各个需要的方法或对象中。
- Spring 能非常简单的帮我们管理数据库事务
-
一些概念:
- 非侵入式设计:没有继承框架的类
- 轻量级与重量级:轻量级一般是非入侵的,所依赖的东西很少,部署简单
- 容器:装对象的对象
- 控制反转:由容器控制程序之间的关系
- bean:容器管理对象
- POJO:简单的 JAVA 对象,不继承不实现其他框架类或接口
-
spring 的优点
- 非常轻量的容器:spring 容器是非侵入的,以集中的、自动化的方式进行应用程序对象创建和装配,除此之外还会负责管理对象生命周期,能组合成复杂的应用程序。
- AOP:面相切面编程,可以通过在编译期间、装载期间或运行期间实现在不修改源代码的情况下给程序动态添加功能的一种技术。如安全、日志记录等
- 简单的数据库事务管理
- 灵活的 web 层支持
- 简化各种技术集成
使用 Spring
- maven 中引入依赖
<?xml version = "1.0" encoding = "UTF-8"?> <project xmlns = "http://maven.apache.org/POM/4.0.0" xmlns:xsi = "http://www.w3.org/2001/XMLSchema-instance" xsi:schemaLocation = "http://maven.apache.org/POM/4.0.0 http://maven.apache.org/xsd/maven-4.0.0.xsd"> <modelVersion>4.0.0</modelVersion> <groupId>com.shiyanlou.spring</groupId> <artifactId>bean</artifactId> <version>1.0-SNAPSHOT</version> <name>bean</name> <properties> <project.build.sourceEncoding>UTF-8</project.build.sourceEncoding> <maven.compiler.source>1.8</maven.compiler.source> <maven.compiler.target>1.8</maven.compiler.target> <spring.version>5.1.1.RELEASE</spring.version> </properties> <dependencies> <dependency> <groupId>org.springframework</groupId> <artifactId>spring-core</artifactId> <version>${spring.version}</version> </dependency> <dependency> <groupId>org.springframework</groupId> <artifactId>spring-context</artifactId> <version>${spring.version}</version> </dependency> </dependencies> </project> - 可以只添加 context,因为 context 依赖于 core,core 会被自动引入
反转控制&依赖注入 IOC
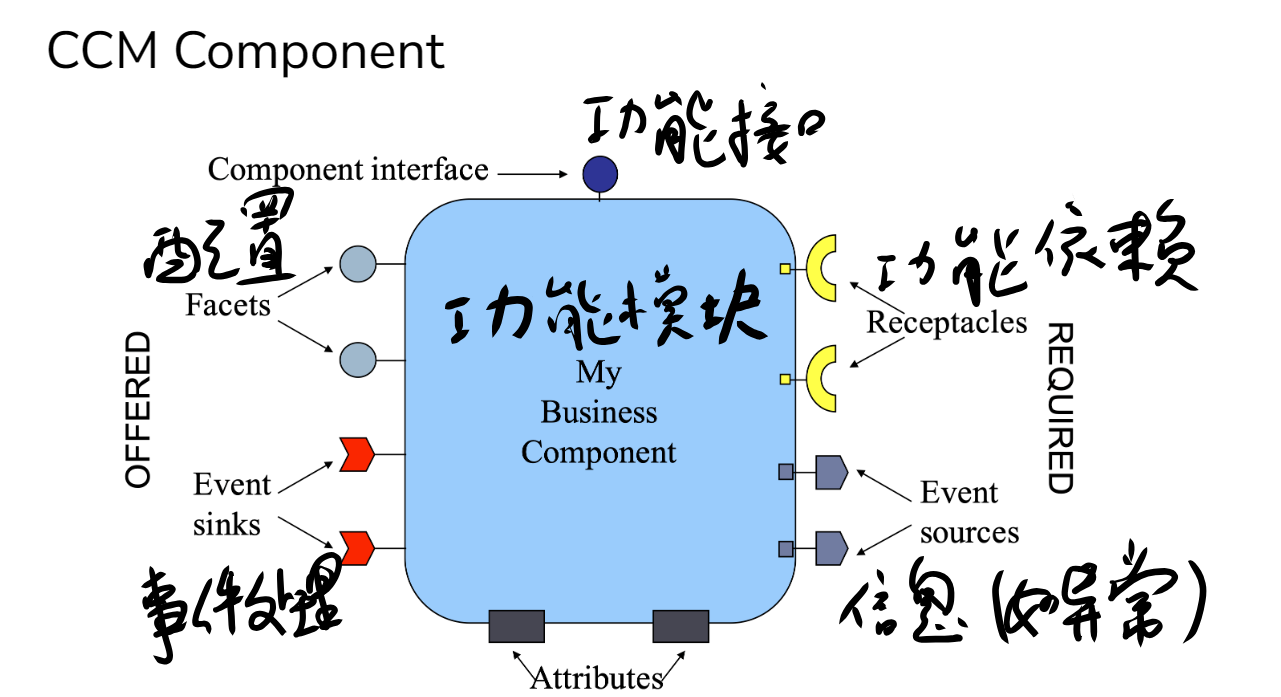
什么是组件
- ccm 抽象构建
- spring:支持构建现代化的构件软件系统
- spring 负责对构件管理和组装,即由 spring 框架来控制程序中各个类之间的关系

控制反转 IOC
-
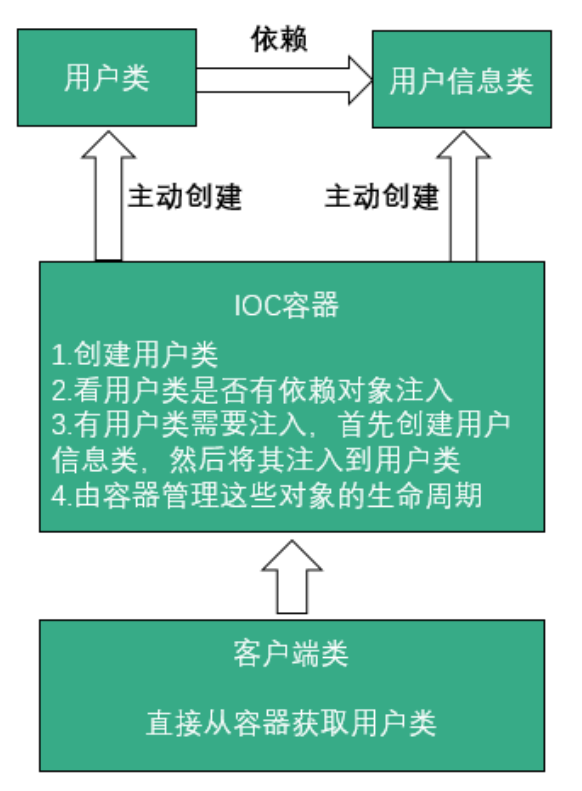
控制反转就是指模块将内部的控制权交给了外部
-
软件设计中的依赖注入模式。在 IoC 模式中,控制权从程序代码转移给了外部系统或框架
- 传统程序设计是在对象内部直接 new 创建对象,而 IoC 是通过专门的容器(context)创建对象,由 IoC 控制对象
-
比如有一个程序 MovieLister 有一个功能是使用实现了 MovieFinder 接口的类从列表中寻找符合条件的项
- 依赖注入是 IoC 的一种形式,它涉及到在运行时动态地将具体的
MovieFinder实现注入到MovieLister中,而不是由MovieLister自己构造或查找MovieFinder的实现。这样,我们就可以在不改变MovieLister代码的情况下,改变它所依赖的电影查找方式,增加了代码的模块化和灵活性。 - 在 Lister 内自己创建就不是一个好设计,写死了算法
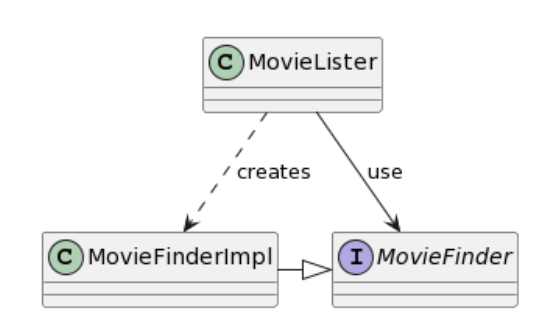
- 也就是说应该由第三方来组装 MovieLister 和 MovieFinderImpI(依赖注入)
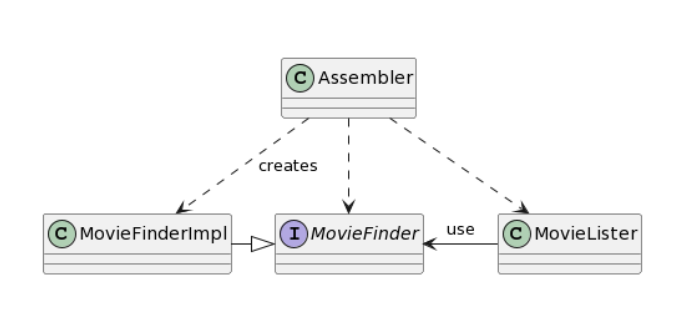
public class MovieLister{
  MovieFinder finder;

  public void setFinder(MovieFinder finder){
    this.finder = finder;
  }
  ...
}
- 依赖注入是 IoC 的一种形式,它涉及到在运行时动态地将具体的
- 依赖注入方法分类:
- 构造器注入:
MovieLister的依赖会在MovieLister实例化的时候通过构造器传递进来。 - 设置值注入:这允许在对象创建后的任何时刻注入依赖,提供了更大的灵活性。
- 接口注入:任何需要使用
MovieFinder的类(如MovieLister)都需要实现这个接口,并通过实现的injectFinder方法接收依赖注入。
- 构造器注入:
实现控制反转
- bean 的三种定义方式:基于 XML、基于注解、基于 JAVA 类
bean 的作用域
- singleton — 单例模式,由 IOC 容器返回一个唯一的 bean 实例。
- prototype — 原型模式,被请求时,每次返回一个新的 bean 实例。
- request — 每个 HTTP Request 请求返回一个唯一的 Bean 实例。
- session — 每个 HTTP Session 返回一个唯一的 Bean 实例。
- globalSession — Http Session 全局 Bean 实例。
bean 的生命周期
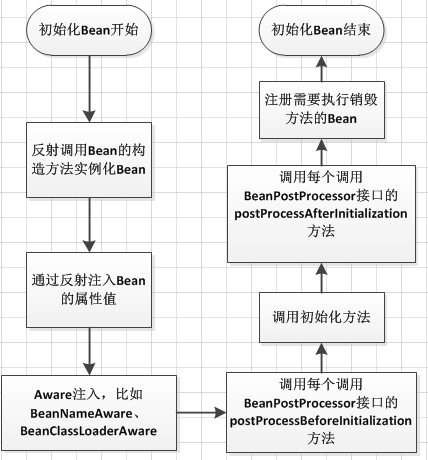
- 一般担当管理角色的是 BeanFactory 或者 ApplicationContext
- Bean 的建立,由 BeanFactory 读取 Bean 定义文件,并生成各个实例。
- Setter 注入,执行 Bean 的属性依赖注入。
- BeanNameAware 的
setBeanName(),如果实现该接口,则执行其 setBeanName 方法 - BeanFactoryAware 的
setBeanFactory(),如果实现该接口,则执行其 setBeanFactory 方法。 - BeanPostProcessor 的
processBeforeInitialization(),如果有关联的 processor,则在 Bean 初始化之前都会执行这个实例的processBeforeInitialization()方法。 - InitializingBean 的
afterPropertiesSet(),如果实现了该接口,则执行其afterPropertiesSet()方法。 - Bean 定义文件中定义 init-method。
- BeanPostProcessors 的
processAfterInitialization(),如果有关联的 processor,则在 Bean 初始化之前都会执行这个实例的processAfterInitialization()方法。 - DisposableBean 的
destroy(),在容器关闭时,如果 Bean 类实现了该接口,则执行它的destroy()方法。 - Bean 定义文件中定义 destroy-method,在容器关闭时,可以在 Bean 定义文件中使用“destory-method”定义的方法。
使用 XML 配置文件实现
- 在 xml 中配置(bean 就表示构件, 通常在 src/main/resources 下)
<beans> <bean id="MovieLister" class="spring.MovieLister"> <property name="finder"> <ref local="MovieFinder" /> </property> </bean> <bean id="MovieFinder" class="spring.ColonMovieFinder"> <property name="filename"> <value>movies1.txt</value> </property> </bean> <!-- 另一种配置方法 缩写方法--> <!-- <bean id = "FileNameGenerator" class = "com.shiyanlou.spring.bean.FileNameGenerator"> <property name = "name" value = "shiyanlou" /> <property name = "type" value = "txt" /> </bean> --> <!--pschema方法--> <!-- <bean id = "FileNameGenerator" class = "com.shiyanlou.spring.bean.FileNameGenerator" p:name = "shiyanlou" p:type = "txt" /> --> </beans> - 通过 property 标签为 name 属性设置默认值,在创建实例时会自动先进性赋值
- 对于属性 finder 会自动去找对应的 setFinder 来对属性值进行修改
-
有三种配置方式:完整、缩写、pschema
使用pschma要在beans配置加上 xmlns:p = "http://www.springframework.org/schema/p" -
spring 通过 xml 配置文件对构件进行组装
public void testWithSpring() throws Exception{
//加载spring配置文件
  ApplicationContext ctx = new FileSystemXmlApplicationContext("spring.xml");
//使用配置文件创建对象并还原类型
  MovieLister lister = (MovieLister) ctx.getBean("MovieLister");

  Movie[] movies = lister.moviesDirectedBy("Sergio Leone");

  assertEquals("Once Upon a Time in the West", movies[0].getTitle());
}
使用注解方式
-
过程
- 组件扫描:Spring 扫描类路径,寻找所有标有
@Component(及其特化版本如@Service、@Repository、@Controller等)的类。 - 实例化 bean:对于每一个找到的类,Spring 都会创建一个实例,并将这个实例放入 Spring 容器中。
- 依赖注入:对于那些需要依赖的 bean,Spring 会查找容器中匹配的 bean,并通过
@Autowired注解自动注入这些依赖。
- 组件扫描:Spring 扫描类路径,寻找所有标有
-
通过使用注释 @Configuration 告诉 Spring,这个 Class 是 Spring 的核心配置文件,并且通过使用注解 @Bean 定义 bean
- 当 Spring 容器启动时,它会扫描包含
@Configuration注解的类,并执行其中的@Bean注解的方法,将返回的对象作为 beans 注册到容器中。
- 当 Spring 容器启动时,它会扫描包含
- 定义 bean
package com.shiyanlou.spring.java_config; import org.springframework.context.annotation.Bean; import org.springframework.context.annotation.Configuration; @Configuration public class AppConfig { @Bean(name = "animal") public IAnimal getAnimal(){ return new Dog(); } } - @Configuration 标记类,@Bean 在内部标记需要由同期托管的方法
-
三个等效名称(功能无区别)
- @Controller:对应表现层的 Bean,也就是 Action
- @Service:对应的是业务层 Bean
- @Repository:对应数据访问层 Bean
-
将类声明为 Bean 使用
@Component表示这个 Class 是一个自动扫描组件@Component public class MyComponent { // Spring将自动将此类的实例注册为bean } - 默认情况下,Spring 将把组件 Class 的第一个字母变成小写,来作为自动扫描组件的名称
- 即
context.getBean("myComponent"); - 该类会被自动注册为 bean
- 即
- 自定义扫描组件的名称
- 添加注解
@Service("AAA")指出名称
- 添加注解
-
优先匹配
@Primary -
属性注入
Autowired(自动装配)- 自动尝试满足该依赖:Spring 查找容器中与字段、构造函数参数或方法参数匹配类型的其他 bean,并将这些 bean注入到标有
@Autowired的地方。
- 自动尝试满足该依赖:Spring 查找容器中与字段、构造函数参数或方法参数匹配类型的其他 bean,并将这些 bean注入到标有
- 明确指出要注入的内容
@Autowired @Qualifier("specificBean") private MyBean myBean; //构造函数要写在行内 @Autowired public AsciiPanel(int width, int height,@Qualifier("cp437_9x16") AsciiFont font) - 当使用
@Autowired注解在构造函数上时,Spring 容器会尝试自动注入构造函数参数所需的所有依赖。这里的“依赖”指的是 Spring 容器可以管理的 beans,通常是自定义的类实例或通过配置声明的实例 -
Spring 默认不会尝试注入基本类型的值,因为它预期这些值是明确指定的,而不是通过依赖注入管理。如果需要注入基本类型的值,应该使用
@Value注解来指定这些值。@Autowired public AsciiPanel(@Value("${panel.width}") int width, @Value("${panel.height}") int height, AsciiFont font) { // ... } -
@Required表示必须注入,属性必须在XML配置文件中被设置,或者通过其他配置方式(如Java配置)显式提供,否则Spring容器会在运行时抛出异常
使用注解时的 xml 配置
- xml 的配置
- 加入了
context:component-scan标签,beans中也加入了标签,这样就将 Spring 的自动扫描特性引入,base-package表示组件的存放位置,Spring 将扫描对应文件夹下的 bean(用 @Component 注释过的),将这些 bean 注册到容器中。<?xml version = "1.0" encoding = "UTF-8"?> <beans xmlns = "http://www.springframework.org/schema/beans" xmlns:xsi = "http://www.w3.org/2001/XMLSchema-instance" xmlns:context = "http://www.springframework.org/schema/context" xsi:schemaLocation = " http://www.springframework.org/schema/context http://www.springframework.org/schema/context/spring-context.xsd http://www.springframework.org/schema/beans http://www.springframework.org/schema/beans/spring-beans.xsd"> <context:component-scan base-package = "com.shiyanlou.spring"/> </beans>
- 加入了
- 添加过滤的自动扫描
 <beans xmlns = "http://www.springframework.org/schema/beans"
    xmlns:xsi = "http://www.w3.org/2001/XMLSchema-instance"
    xmlns:context = "http://www.springframework.org/schema/context"
    xsi:schemaLocation = "
            http://www.springframework.org/schema/context
            http://www.springframework.org/schema/context/spring-context.xsd
            http://www.springframework.org/schema/beans
            http://www.springframework.org/schema/beans/spring-beans.xsd">

    <context:component-scan base-package = "com.shiyanlou.spring" >

        <context:include-filter type = "regex"
                       expression = "com.shiyanlou.spring.dao.*DAO.*" />

        <context:include-filter type = "regex"
                       expression = "com.shiyanlou.spring.services.*Service.*" />

    </context:component-scan>

</beans>
嵌套 Bean
- 使用 xml
 <bean id = "CustomerBean" class = "com.shiyanlou.spring.innerbean.Customer">
        <property name = "person">
            <bean class = "com.shiyanlou.spring.innerbean.Person">
                <property name = "name" value = "shiyanlou" />
                <property name = "address" value = "chengdu" />
                <property name = "age" value = "25" />
            </bean>
        </property>
  </bean>
集合类型的 Bean
- 使用 xml 注入到不同类型的集合
<?xml version = "1.0" encoding = "UTF-8"?>
<beans xmlns = "http://www.springframework.org/schema/beans"
    xmlns:xsi = "http://www.w3.org/2001/XMLSchema-instance"
    xsi:schemaLocation = "http://www.springframework.org/schema/beans
    http://www.springframework.org/schema/beans/spring-beans.xsd">

    <!--bean的 id 最好首字母小写 -->
    <bean id = "customerBean" class = "com.shiyanlou.spring.collections.Customer">

        <!-- java.util.List -->
        <property name = "lists">
            <list>
                <value>1</value>
                <!-- List 属性既可以通过 <value> 注入字符串,也可以通过 <ref> 注入容器中其他的 Bean-->
                 <ref bean = "personBean" />
                 <value>2</value>
                <bean class = "com.shiyanlou.spring.collections.Person">
                    <property name = "name" value = "shiyanlouList" />
                    <property name = "address" value = "chengdu" />
                    <property name = "age" value="25" />
                </bean>
            </list>
        </property>

        <!-- java.util.Set -->
        <property name = "sets">
            <set>
                <value>1</value><!--Set 与 List 类似-->
                <ref bean = "personBean" />
                <bean class = "com.shiyanlou.spring.collections.Person">
                    <property name = "name" value = "shiyanlouSet" />
                    <property name = "address" value = "chengdu" />
                    <property name = "age" value = "25" />
                </bean>
            </set>
        </property>

        <!-- java.util.Map -->
        <property name = "maps">
            <map>
                <entry key = "Key 1" value = "1" />
                <!--一个 entry 就是一个 Map 元素-->
                <entry key = "Key 2" value-ref = "personBean" />
                <entry key = "Key 3">
                    <bean class = "com.shiyanlou.spring.collections.Person">
                        <property name = "name" value = "shiyanlouMap" />
                           <property name = "address" value = "chengdu" />
                        <property name = "age" value = "25" />
                    </bean>
                </entry>
            </map>
        </property>

        <!-- java.util.Properties -->
        <property name = "pros">
        <!-- Properties 类型类似于Map 类型的特例,Map 元素的键值可以对应任何类型的对象,但是Properties只能是字符串-->
            <props>
                <prop key = "admin">admin@nospam.com</prop>
                <prop key = "support">support@nospam.com</prop>
            </props>
        </property>
    </bean>

    <bean id = "personBean" class = "com.shiyanlou.spring.collections.Person">
        <property name = "name" value = "shiyanlouPersonBean" />
        <property name = "address" value = "chengdu" />
        <property name = "age" value = "25" />
    </bean>
</beans>